WinRM (Windows Remote Management) is a management protocol within the Windows Systems, allowing remote command execution and system management. As a tool for remote connectivity, WinRM serves as way automatize task with PowerShell commands to establish and govern remote connections within the Windows environment.
Since it is not enabled by default on Windows systems, it is necessary to configure it to receive WinRM client requests. The process involves setting up WinRM to listen for incoming calls from WinRM clients. thereby establishing the secure remote management and execution of commands within Windows networks.
Overview
There are various alternatives to WinRM exist in Windows environment, including WMIC, PsExec (Sysinternals Utility)1, WinRS (Windows Remote Shell), and OpenSSH. Different tools might be preferred based on specific needs, limitations, or security requirements but WinRM is the one of the most preferred ones. However, WinRM (Windows Remote Management) can be considered the “official” way for remote management and automation tasks in Windows environments. It’s a Microsoft-supported feature that provides a standardized management interface and protocol for remote access and execution of PowerShell commands, scripts, and other management tasks.
Tools like Ansible, Chef and Puppet also offer remote management and configuration capabilities for Windows systems, allowing administrators to automate tasks, manage configurations, and deploy software across multiple machines. Ansible communicates with Windows servers over WinRM using the Python’s pywinrm package and to remotely run PowerShell scripts and commands.1
It’s very beneficial on for automating specific administrative tasks instead of manually doing them by RDP connections. Using these tools we can across multiple machines simultaneously and handling remote configurations using PowerShell’s functionality. Its also remember that these capabilities also require a strong need for security. These access methods should be tightly restricted and, if possible, passed through strong security mechanisms. It should be noted that strong security vulnerabilities can be seen on these systems with their exploits.
WinRM, comprising both a client for outbound calls and a service for inbound calls, can be checked for proper configuration using the Test-WSMan cmdlet.
We have detailed configurations for client, server (service in this case) and the listener. We can use Invoke-Command after opening a session on one or many computers.
We can test WinRM is exist on a computer by using Test-WSMan command.
When Test-WSMan command returns no errors, it indicates that WinRM has its basic settings correctly configured.
An example of a successful output could be:
> Test-WSMan
wsmid           : http://schemas.dmtf.org/wbem/wsman/identity/1/wsmanidentity.xsd
ProtocolVersion : http://schemas.dmtf.org/wbem/wsman/1/wsman.xsd
ProductVendor   : Microsoft Corporation
ProductVersion  : OS: 0.0.0 SP: 0.0 Stack: 3.0
If a computer encounters an error, such as “The client cannot connect,” while running Test-WSMan, it typically indicates that the system isn’t set up to receive or send calls properly.
1. Configurations
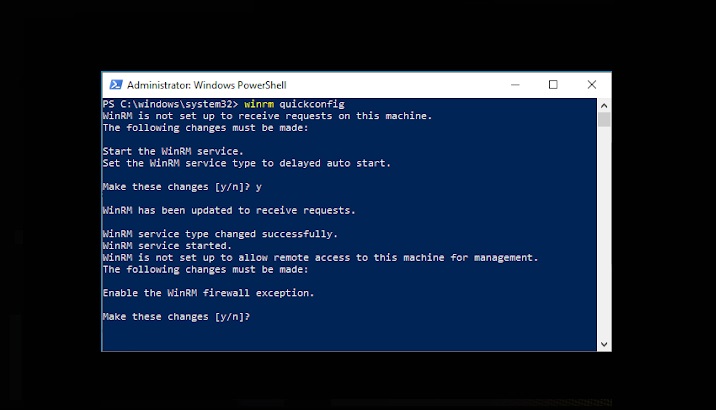
We can use winrm quickconfig command perform basic WinRM configuration.
It helps establish the basic WinRM settings on a computer by providing remote connectivity.
winrm quickconfig
Running winrm quickconfig in the command prompt or powerShell will perform a quick configuration of WinRM using the default settings.
It will enable the WinRM service and create a listener for the HTTP transport on the default port 5985.
This basic configuration is suitable for testing and development purposes within a local network.
It will configure it with default settings for both server and the client.
We can see an example of making more specific settings with quickconfig as below.
winrm quickconfig -transport:https
The command above is specifically configures WinRM to use the HTTPS transport instead of HTTP. As a more secure option for production environments or scenarios where data needs to be encrypted during transmission. WinRM uses port 5986 as the default port for HTTPS. To check the current WinRM client and service configurations, we can use the following command:
winrm get winrm/config/client
winrm get winrm/config/client will display the client-specific configurations, such as the default authentication settings and the maximum number of concurrent operations allowed.
To view the WinRM service configuration we need to use winrm get winrm/config/service:
winrm get winrm/config/service
We also have a listener configuration on the service side apart from client` and service configurations:
winrm enumerate winrm/config/listener
In following sections we will look at this configurations in some detail.
1.1 Client Configuration
If we check the client configuration in detail by using winrm get winrm/config/client we see that the configuration shown below is defined:
Client Configuration:
    Network Delay (ms) = 5000
    URL Prefix = wsman
    Allow Unencrypted = false
    Authentication: // This client is configured to use default auth protocols (authentication methods).
        - Basic = enabled
        - Digest = enabled
        - Kerberos = enabled
        - Negotiate = enabled
        - Certificate = enabled
        - CredSSP = disabled
    Default Ports: // This client will use default ports to connect outbound.
        - HTTP = 5985
        - HTTPS = 5986
    Trusted Hosts = MyServer // One trusted port.
As we can see 5985 for HTTP and 5986 default ports are defined for the client. Client will use this default ports to connect outbound.
Also by default WinRM operates on port 5985 using HTTP for communication. This is commonly utilized for domain-to-domain traffic. It can be reconfigured to use HTTPS for enhanced security and encrypted communication.
We also see that this client is configured to use default auth protocols like Kerberos, Negotiate and CredSSP.
1.2 Service Configuration
- We can check the service configuration like in similar with the client.
- By default service is enabled to receve inbound communications.
- We have to make sure that we run
winrm get winrm/config/servicecommand as an administrator; otherwise, it probably result in aWSManFaulterror due to the restricted permission.
winrm get winrm/config/service
As we can see the configuration below:
- Contrasting from the client, server only accepts Kerberos and Negotiate authentication protocols as default.
- Server utilizes the default ports 5985 and 5986 as same as we see in the client configuration.
- We see the
AllowRemoteAccess = trueline which signifies that remote access is permitted.
Service Configuration:
    RootSDDL = O:NSG:BAD:P(A;;GA;;;BA)(A;;GR;;;IU)S:P(AU;FA;GA;;;WD)(AU;SA;GXGW;;;WD)
    MaxConcurrentOperations = 4294967295
    MaxConcurrentOperationsPerUser = 1500
    EnumerationTimeoutms = 240000
    MaxConnections = 300
    MaxPacketRetrievalTimeSeconds = 120
    AllowUnencrypted = false
    Authentication:
        Basic = false
        Kerberos = true
        Negotiate = true
        Certificate = false
        CredSSP = false
        CbtHardeningLevel = Relaxed
    DefaultPorts
        HTTP = 5985
        HTTPS = 5986
    IPv4Filter = *
    IPv6Filter = *
    EnableCompatibilityHttpListener = false
    EnableCompatibilityHttpsListener = false
    CertificateThumbprint
    AllowRemoteAccess = true
1.3 Listener Configuration
Finally, there is a component known as the listener, responsible for monitoring calls on a server.
To examine the existing WinRM listener setup, one can execute the following command in either PowerShell or the command prompt:
winrm enumerate winrm/config/listener
The listener configuration is displayed as follows:
Listener
    Address = *
    Transport = HTTP
    Port = 5985
    Hostname
    Enabled = true
    URLPrefix = wsman
    CertificateThumbprint
    ListeningOn = 127.0.0.1, 172.16.1.193, ::1
- The currently active IP addresses for listening, accommodating multiple NICs. It can be configured to listen IP addresses.
- It is strictly using HTTP.
- While the current configuration is basic, it can be customized for enhanced security, such as restricting access to specific addresses, employing specific protocols, and utilizing designated authentication mechanisms.
2. Windows To Windows Remote Connection
In our scenario, both devices operate within the same domain, a common occurrence in an enterprise environment.
We can see computername and domain by accessing writing the name of the variables like $env:COMPNAME and $env:USERDOMAIN.
We will WinRM on HTTP by default.
We acquire credentials securely using the Get-Credential cmdlet and store the results in a variable named ‘credential’:
$credential = Get-Credential
To confirm the WinRM connection on the remote device we specify the authentication type. If unsure, setting it to ‘Negotiate’ is a recommended approach.
$RemoteDeviceName = 'remotewindows01'
Test-WSMan $RemoteDeviceName -Authentication Negotiate -Credential $credential
Same as the local results, the remote setup, indicating the configured credentials, authentication methods, and confirmation that the remote machine is set up with WinRM and is accepting connections.
To verify if the local computer is listening on the WinRM port (5985), use the following command:
Get-NetTCPConnection -LocalPort 5985
Please note, the execution of this command requires PowerShell version 5.1. You can check your PowerShell version using:
$PSVersionTable
If you need to access PowerShell 5 on the same computer, launch it separately and execute the command there.
To check if a remote device is listening on the WinRM port:
Test-NetConnection -Computername 192.168.34.13 -Port 5985
Similar to how SSH operates in Linux, you can establish a PowerShell session on a remote device using the following commands:
$credential = Get-Credential
Enter-PSSession -ComputerName RemoteDeviceName -Credential $credential
The Enter-PSSession command facilitates a connection to a single remote device.
To exit the session, simply type:
exit
We used a single session but WinRM allows the management of multiple servers through sessions, streamlining administrative tasks across a network of servers
3. Make It Work On Many Devices
Using New-PSSession allows managing multiple devices concurrently.
Initially, we can create a session for a single device by using past credentials:
$session = New-PSSession -ComputerName RemoteDeviceName -Credential $credential
The created sessions are stored in the $session object. We can verify the sessions with:
$session
To execute tasks on these sessions, we can utilize Invoke-Command with its ScriptBlock parameter:
Invoke-Command -Session $session -ScriptBlock {hostname}
This command retrieves the hostname of the respective server.
Extending this to multiple devices involves using a list of servers stored in a file (e.g., C:\listOfServers.txt) and establishing sessions for each device:
$devices = Get-Content -Path C:\listOfServers.txt
$credential = Get-Credential
$multiSession = New-PSSession -ComputerName $devices -Credential $credential
Invoke-Command -Session $multiSession -ScriptBlock {hostname}
This script reads a list of servers from the file, creates sessions for each server using the stored credentials, and executes a command to retrieve the hostname from each session.
For executing specific tasks across multiple devices: (Number of CPU’s for that case.)
Invoke-Command -Session $sessions -ScriptBlock { (Get-CimInstance Win32_ComputerSystem).NumberOfLogicalProcessors }
Remember, when running tasks across multiple sessions, they execute in parallel, making it difficult to determine the exact sequence of completion.
The script below performs remote tasks on multiple servers specified in the $servers array using Invoke-Command.
It gathers information about the number of CPUs on each server and handles any connection errors that might occur during the process.
Splatting It’s particularly helpful when you have a lot of parameters to pass to a command, making your script more readable and maintainable.
# Define the list of servers
$servers = 'Server1', 'Server2', 'Server3', 'Server4'

# Retrieve credentials for remote access
$creds = Get-Credential

# Initialize an array to store remote execution results
$remoteResults = @()

# Declare a splat to pass parameters to Invoke-Command
$invokeSplat = @{
    ComputerName  = $servers
    Credential    = $creds
    ErrorVariable = 'connectErrors'
    ErrorAction   = 'SilentlyContinue'
}

# Execute a command on remote servers to fetch CPU information
$remoteResults = Invoke-Command @invokeSplat -ScriptBlock {
    $obj = [PSCustomObject]@{
        Name = $using:env:COMPUTERNAME  # Use $using to access local variables
        CPUs = "-------"
    }

    $obj.CPUs = (Get-CimInstance Win32_ComputerSystem).NumberOfLogicalProcessors
    return $obj
}

# Handle any connection failures that occurred during remote execution
$remoteFailures = $connectErrors.CategoryInfo `
    | Where-Object {$_.Reason -eq 'PSRemotingTransportException'} `
    | Select-Object TargetName, @{n = 'ErrorInfo'; E = {$_.Reason} }